|
|
|
|
|
|
|
|
Set the Template Size |
• |
The template size is based on
the Page size in the designing area. As such, set
the page size to match the final output (print and
cut size) of the artwork, see
Pages.
|
|
|
|
|
|
Open the Contour Cutting Wizard |
1. |
In SignMaster Cut click on the
Pick tool
 |
|
|
2. |
Click on the Object or Objects that you wish to
Contour Cut (outline);
|
|
|
|
|
|
|
|
 |
|
|
|
|
|
|
3. |
From the top toolbar, click on
Contour Cutting Wizard (as shown directly above) and
Contour Cutting Wizard will open. |
|
|
 |
You can also click on the
File
menu → Contour Cutting → Contour
Cutting Wizard. |
|
|
|
|
|
Set the Mark Type and Position |
• |
At this stage you must select
the vinyl cutter you wish to use, and the settings
which apply so the correct marks are used for the
template. Click here for:
Laser
cutters. Once set you can move onto the next step
(below).
|
|
|
|
|
|
Create a Template |
|
 |
|
|
|
|
|
|
1. |
In the Contour Cutting
Wizard (see above) click on the
Template tab;
|
|
|
2. |
Select Enable Template
and then click Save Template, and
the Save window will open;
|
|
|
3. |
Navigate to a location on your
computer, type in a file name you will remember and
click Save, and a PDF file will be
saved to that location.
|
|
|
 |
This PDF file will be used in your
other graphics program to layout your artwork and will
have a Template ID in the top left
corner for later reference, see below. |
|
|
|
|
|
Import Template, Add Artwork and Export |
|
 |
| |
|
Example shown using CorelDRAW® |
|
|
|
|
|
|
|
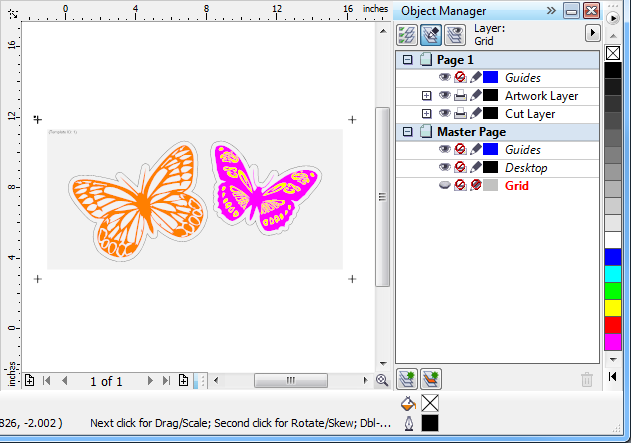
1. |
In your other graphics program
import the Template file that you have saved
earlier; |
|
|
|
For information on importing
please refer to your other graphics program's help file
or manual. |
|
|
2. |
Position your artwork with
both the print and cut objects to be within the
boundary of the template's page, which is indicated
by a light grey color (see directly above and below);
|
|
|
|
|
|
|
|
 |
| |
|
Example shown using CorelDRAW® |
|
|
|
|
|
|
|
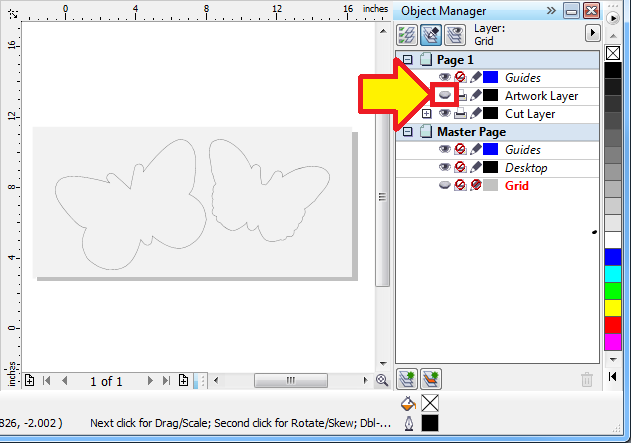
3. |
Create a new layer
and name it
the Cut Layer (or similar);
|
|
|
4. |
Move the contour cut lines
(vectors) to this layer without changing their
position with respect the template, as shown
directly above;
|
|
|
5. |
Export this layer as either an
.ai, .eps or .pdf file to a location you will
remember on your computer;
|
|
|
6. |
Print the
artwork that you wish to contour cut and then
load it correctly into your vinyl
cutter ready to be contour cut making sure there are
no areas that are lifting or buckling along the edge
of the media;
|
|
|
|
For information about performing
any of these operations, please refer to your other
graphics program's help file or manual. |
|
|
|
|
|
Import Saved Vector Artwork,
Match Template ID and Contour Cut |
1. |
In SignMaster Cut click the
File
menu → Import → File;
|
|
|
2. |
Navigate to where you saved
the file earlier select it and click Open,
and paste the file into the designing area;
|
|
|
3. |
With only the Artwork
Selected open the Contour Cutting Wizard
(as explained above);
|
|
|
|
|
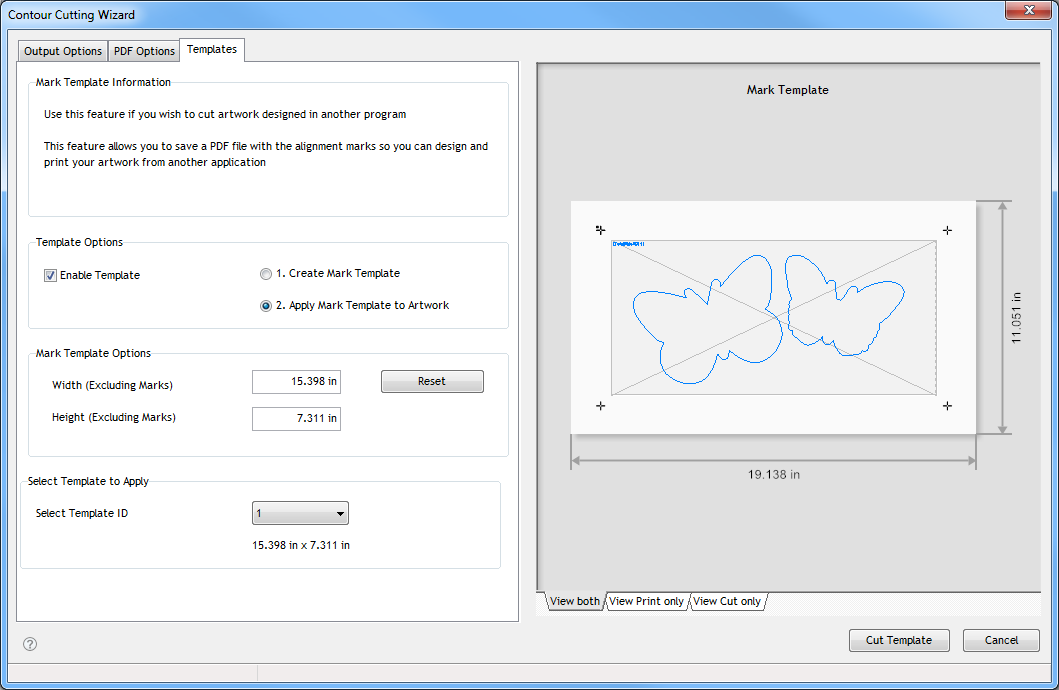
Contour Cutting Wizard |
 |
|
Click Image to
Magnify [+] |
|
|
|
|
|
|
|
1. |
In the Contour Cutting
Wizard (see above) click on the
Template tab;
|
|
|
2. |
Select Enable Template
and then click Apply Mark Template to
Artwork, (as shown directly above);
|
|
|
3. |
Select the corresponding
template number from Select Template ID
(this must match the loaded artwork's Template ID),
and you will see the cutfile in the preview (as
shown directly above).
|
|
|
4. |
Click Cut Template
and the Align Cutfile Wizard will open;
|
|
|
5. |
Follow the same instructions
at this stage from the help files for the cutter
type you have. Click here for:
Laser
cutters
|
|
|