Previous related topic...Next related topic...

Working with Power Shapes

Future Corporation Help

On This Page

Overview

Elastic (Rubber) Mode

Create a Circle

Edit a Circle (Visually)

Edit a Circle (Numerically)

Wireframe

Add a Pen Style

Set Transformations (size, position, rotation etc.)

Circle/Ellipse

Power Shapes Flyout

Power Shapes

Overview
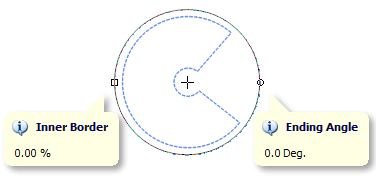
Power shapes come with special nodes to edit the look and size of the shape. These nodes can be adjusted with the mouse, the shape's dedicated tools (available in the 2nd row of tools in SignMaster Cut) and from the Property Inspector.

Elastic (Rubber) Mode
Shapes can be resized using two different methods in SignMaster Cut. By default shapes are resized proportionally which means that parts of the shape such as the corner radius remain as they have been originally set by the user. The other resizing method: Elastic or Rubber mode allows you to resize the shape as if it were on a sheet of perfectly stretchable rubber. This allows you to stretch the shape into any shape you require.

Working with Circles

To

Do the following

1.

Click on the Power Shapes flyout

2. Click on the Circle tool (as shown above)
3. Click anywhere in the drawing area, hold down the mouse button and drag out a Circle shape;


Note: Circle Shown in Wireframe Fill

4. When satisfied with the Circle shape let go of the mouse button.
Edit a Circle (Visually) 1. Click on the Node edit tool
2. Click on the Circle you wish to edit;
3. Click on:
The Inner Border node to adjust the Border Thickness.
The Ending Angle node to adjust the Shape effect.
Edit a Circle (Numerically)
1. Click on either the Pick tool or the Node edit tool
2. Click on the Circle/Ellipse you wish to edit;
3. Click this button: reveal/hide to reveal the Circle/Ellipse tools (if not already visible);
4. Click on the required Up or Down arrow to adjust the Circle/Ellipse's attributes as required (see above) or type in a numeric value.
Wireframe 1. Click on either the Pick tool or the Node edit tool
2. Click on the Circle/Ellipse you wish to edit;
3. Click this button: reveal/hide to reveal the Circle/Ellipse tools (if not already visible);
Click on the Wireframe tool to place the Circle/Ellipse in wireframe view;
This setting only affects the Circle/Ellipse and no other object.
Add a Pen Style
1. Click on either the Pick tool or the Node edit tool
2. Click on the Circle/Ellipse you wish to edit;
3. Click this button: reveal/hide to reveal the Circle/Ellipse tools (if not already visible);
4. Click on Pen Style and select the required style (type of pen);
5. Click on the required Up or Down arrow to adjust the Pen Style's Thickness as required, or type in a numeric value.
You can also adjust these settings from the Property Inspector.
Set Transformations See Working with Objects.

Shapes can also be converted curves (Ctrl+Q) to be edited as a curve.


Related Topics

Elastic Mode (Rubber Mode)
Property Inspector
Working with Objects

- - - - - - - - - - - - - - - - - - - - - - - - - - - -
Squares


| |