Overview
SignMaster Cut comes with a large suite of alignment tools
to assist you in laying out your work accurately and to
save your time. The alignment tools are designed to work
on (a) the objects themselves, or (b) the page
the objects are associated with, or (c) the active
object which is simply the last selected object in the
alignment group. This system provides for comprehensive
alignment of all your objects when working with the
program.
Default Shortcuts
The following are the default
Align Keyboard Shortcuts when one or more objects
are selected in Object-mode (unless changed by
the user):
Align Left
L
Align Right
R
Align Top
T
Align Bottom
B
Align Centers Horizontally
E
Align Centers Vertically
C
How
to Use
the Alignment Tools
To
Do the following
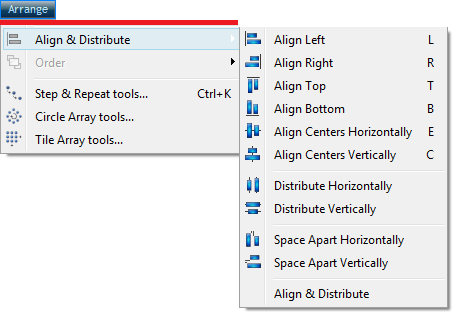
Open the Alignment tools
•
Click on Tools (as
shown above) and then select Align, Space
and Distribute Tools
and click the Align
tab or;
Click on the Alignment
flyout (as
shown directly above) and then click
Alignment
and the Align tools will come up;
3.
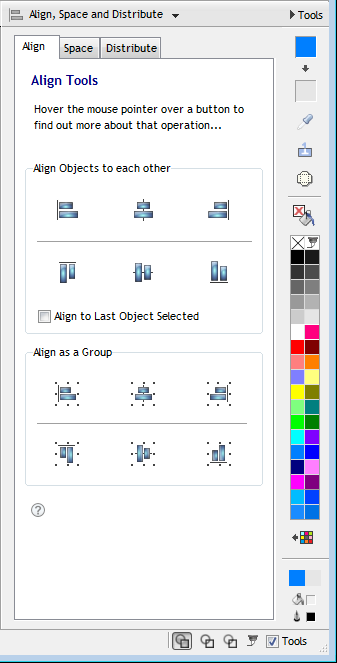
Click on the Align tab (as shown directly below):
The Align tab provides you
with a number of alignment combinations and provides
an interactive (live) preview in the designing area as
you make your selections, as explained below:
Align 2+ Objects to each other
1.
Open the Align tab
as explained above;
2.
Click on the Pick tool
and select
the objects you wish to Align,
see
Selecting Objects;
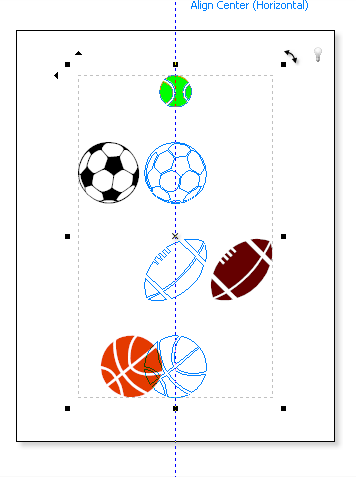
3.
Hover your mouse over the
Alignment you wish to use from 1 of the 6 options in
the Align Object to each other options
to see a preview (in the designing area) of how the
selected objects will align if the button is
clicked;
See an example of an on-screen
preview at the top of this page.
4.
Click the Alignment you wish to use
and the objects will reposition as shown in the preview.
Align 2+ Objects to the Last Object
1.
Open the Align tab
as explained above;
2.
Click on the Pick tool
and select
the objects you wish to Align and using the
Shift key select the Object you wish all other
Objects to Align to,
see
Selecting Objects;
3.
Select the Align to Last
Object Selected checkbox;
4.
Hover your mouse over the
Alignment you wish to use from 1 of the 6 options in
the Align Object to each other options
to see a preview (in the designing area) of how the
selected objects will align if the button is
clicked;
See an example of an on-screen
preview at the top of this page.
5.
Click the Alignment you wish to use
and the objects will reposition as shown in the preview.
Align Object(s) as a Group
1.
Open the Align tab
as explained above;
2.
Click on the Pick tool
and select
the object or objects you wish to Align,
see
Selecting Objects;
3.
Hover your mouse over the
Alignment you wish to use from 1 of the 6 options in
the Align as a Group options to see a
preview (in the designing area) of how the selected
objects will align if the button is
clicked;
See an example of an on-screen
preview at the top of this page.
4.
Click the Alignment you wish to use
and the objects will reposition as shown in the preview.
When using this option the object(s)
are treated as a Group for the operation only.
You can also access the
Distribute tool panel from the
Tools menu
→ DesignCenter
→ Align Tools.